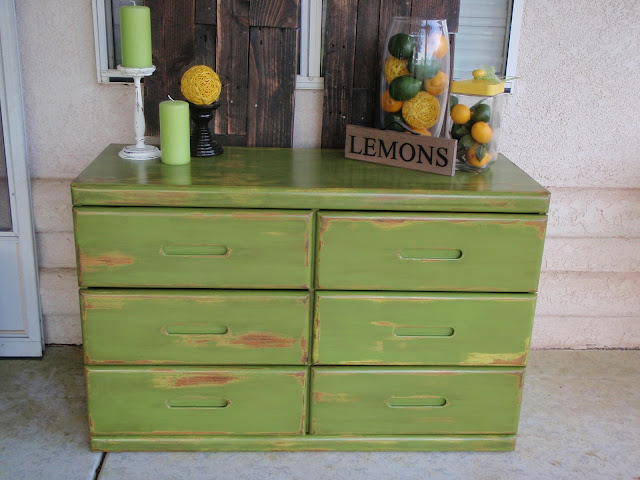
Anyway I decided to refinish it in my own way of refinishing. And believe me, I know exactly what I am doing. I mean, I've read enough blogs, right?? Wrong! (well all except the reading enough blogs part.) I am in no way a pro and definitely just wing things, but it seems to be working for me so far. So here are my steps to an easy furniture makeover, probably in all the wrong ways! But it works for someone like me who doesn't do this for a living and does not have any equipment to make the job easier. This is a way that an everyday stay at home mom (or working mother of course) can easily get the job done.
First, I gave it a light all-over sanding. (Sorry, no pics for that one... I forgot until I was half way done.)
(If i were to really do a good job at this, this is were I would stop and tape off my drawers and dresser to keep the paint from going all over and having uneven lines. But I'm not selling this dresser and therefore, not worried about the behind-the-scenes detail... After all, this is supposed to be a fast 'n easy makeover, right?)
Then, I sprayed it down with a can of yellow spray paint. I used the Rust-oleum satin finish in Lemon Grass. I've painted furniture using a can of spray paint and i've done it the ol' fashion way of using a good ol' can of paint and a paint brush. I like the smoother finish of the spray can... Plus its easier to get in corners and grooves and less drips if done right. Since I dont have my very own awesome paint sprayer, I waste money on the spray cans. I just did one nice even coat and let it dry for about an hour.
I decided with this dresser, I wanted to try using two colors layered then distressed. I love that look! (not to mention, the yellow was just too yellow! It kinda freaked me out and I wasn't brave enough to just stick with it.) I then did another very light sanding with a very fine sand paper and sprayed a coat of Rust-oleum Satin Finish. The color is called Eden. (Can I just tell you how much I love this shade of green. LOVE!)
Here it is drying after the second coat of paint (first coat of green). Awesome tip of the day: Cans of dog food work great for holding furniture up off the ground while painting. My cinder blocks were busy at the moment...
I found that these two coats of paint were plenty and I didn't need any additional coats. So once dry (Impatient me didnt want to wait over night for it to really dry), I sanded and distressed heavily. I probably should have waited longer for it to dry. My sand paper kept building up with paint pretty badly. I went through a lot of sand paper. (note to self: have more patience!... and get an electric sander. Christmas maybe??)
After distressing.
After distressing, I pulled out my Dark Walnut stain. Yes thats right, I always keep that on hand for emergencies! Using a sponge brush, I lathered areas with stain and almost immediately wiped it off. I would have normally used glaze for this since it is much easier to work with, however, it wasn't giving me the desired dirty/popping look.
After staining.
Aww, see the difference? I let that dry over night before adding a few coats of Wipe on Poly to finish it off.
And here is my finished dresser. I have to admit, after staining it, it did come out a bit bolder than planned, but hey, Go Green! Right?? It fits right in with my lemon and lime kitchen decor and I am so excited to get moved so I can start using this bad boy cause this is no longer just an ordinary dresser folks!
Ta-dah!!! I kinda like it!


No comments:
Post a Comment