Wednesday, October 24, 2012

A Haunted Apothecary Shelf! boooo


I had a blast making this haunted apothecary shelf.


 look at the difference between this picture and the next one....can you see what has been added?


Peat moss! It makes everything more scary ,(is that correct English  I think not.) 
I started by buying all the unique glassware at a thrift store. Not one was over $2.00. I then bought some Krylon glass spray. I filled up a small spray bottle with 1/2 water, 1/2 white vinegar. Now this is were 2 two people comes in handy, I sprayed the krylon spray and right after Noah sprayed them with the water-vinegar solution. Make sure and do that right after. If you wait it doesn't look as good.

I found some labels on line (I am so sorry, I don't know anything about blogging yet so I don't know how to link you to the site). I then added lots of fun stuff to each bottle and jar. Like jute, wire, I dripped wax on them and modge podged the labels on to give it a milky old look.


I added crepe paper to. My modge podge mixture is 1/2 glue, 1/2 water, it works great. 

I then ripped up some cheese cloth and sprayed it with scrape book walnut ink spray. This worked great.

Be sure and let it dry good in the sun so the color sets. You don't want it coming off on your shelf.

Just slice threw with scissors then pull on the strings to give it an old tattered look.


Then set up your shelf. Be sure and stagger the heights.  From short to tall, never going in any given order. 

OK I got done and I just didn't love it-at all. Something was wrong and kind of blaa about it.


See.....blaaa


Then all I did was add the peat moss. I can't believe the difference! I love it!


I had so much fun doing this shelf! I love the mercury glass, and how creepy it looks. 


something else I added peat moss too, see it's awesome! Creepy-awesome!!!


A Magical Fall Brunch

We are all to busy doing things that don't make  fun memories. That's why I decided to host a fall brunch for three of the greatest ladies ever! So I had to start with a lovely table. I had come across a yard sale a few months earlier, and found the antic linens (my love). The lady had been collecting linen's for 40 years. 

I was in heaven!  These are some of the things I bought, (including the fun silverware).


Yes, that is a cut lace tatted table cloth!!!!


These are some of the best gals ever! Tammy, Wendy,  Paula and I have a  lunch each time it is someones birthday and today we are celebration Wendy's. Usually we go out but I wanted to do something special , so we all brought one food item and had a wonderful time.


What a spread! Fresh pineapple, home made rolls, cashew chicken salad, marshmallow   salad, and fresh strawberry lemonade. I think we talked and laughed for at least 3 hours! Now that's a wonderful memory!


Tuesday, October 23, 2012

Dresser Refinish

Hello All!!


The ol' hubby and I are moving across town to a house with somewhat less kitchen storage space, So to add a little more storage to my soon-to-be new kitchen, I have been looking all over the universe for a cheap hutch type thing to use as storage. Not enough storage space for all my junk. Yes, I have decided it is all junk! Do I use 90% of it... No! but I will continue to store it all until the day i die... or at least until it falls apart and is unusable... but if I dont use it, that day will never come... ughhh. In my 1 week search and with no luck in finding something in my price range, the impatient me decided to improvise and buy this $35 dresser off CraigsList to use as a buffet or sideboard. Yes, yes, I know. It's lovely..(sorry for the awful picture. This is the picture from craigslist. I forgot to get a before pic.) Maybe I should learn some more patience. Probably should have waited for that hutch...


Anyway I decided to refinish it in my own way of refinishing. And believe me, I know exactly what I am doing. I mean, I've read enough blogs, right?? Wrong! (well all except the reading enough blogs part.) I am in no way a pro and definitely just wing things, but it seems to be working for me so far. So here are my steps to an easy furniture makeover, probably in all the wrong ways! But it works for someone like me who doesn't do this for a living and does not have any equipment to make the job easier. This is a way that an everyday stay at home mom (or working mother of course) can easily get the job done.

First, I gave it a light all-over sanding. (Sorry, no pics for that one... I forgot until I was half way done.)

(If i were to really do a good job at this, this is were I would stop and tape off my drawers and dresser to keep the paint from going all over and having uneven lines. But I'm not selling this dresser and therefore, not worried about the behind-the-scenes detail... After all, this is supposed to be a fast 'n easy makeover, right?)

Then, I sprayed it down with a can of yellow spray paint. I used the Rust-oleum satin finish in Lemon Grass. I've painted furniture using a can of spray paint and i've done it the ol' fashion way of using a good ol' can of paint and a paint brush. I like the smoother finish of the spray can... Plus its easier to get in corners and grooves and less drips if done right. Since I dont have my very own awesome paint sprayer, I waste money on the spray cans. I just did one nice even coat and let it dry for about an hour.

I decided with this dresser, I wanted to try using two colors layered then distressed. I love that look! (not to mention, the yellow was just too yellow! It kinda freaked me out and I wasn't brave enough to just stick with it.) I then did another very light sanding with a very fine sand paper and sprayed a coat of Rust-oleum Satin Finish. The color is called Eden. (Can I just tell you how much I love this shade of green. LOVE!) 


Here it is drying after the second coat of paint (first coat of green). Awesome tip of the day: Cans of dog food work great for holding furniture up off the ground while painting. My cinder blocks were busy at the moment...

I found that these two coats of paint were plenty and I didn't need any additional coats. So once dry (Impatient me didnt want to wait over night for it to really dry), I sanded and distressed heavily. I probably should have waited longer for it to dry. My sand paper kept building up with paint pretty badly. I went through a lot of sand paper. (note to self: have more patience!... and get an electric sander. Christmas maybe??) 


After distressing.

After distressing, I pulled out my Dark Walnut stain. Yes thats right, I always keep that on hand for emergencies! Using a sponge brush, I lathered areas with stain and almost immediately wiped it off. I would have normally used glaze for this since it is much easier to work with, however, it wasn't giving me the desired dirty/popping look.

After staining.

Aww, see the difference? I let that dry over night before adding a few coats of Wipe on Poly to finish it off. 

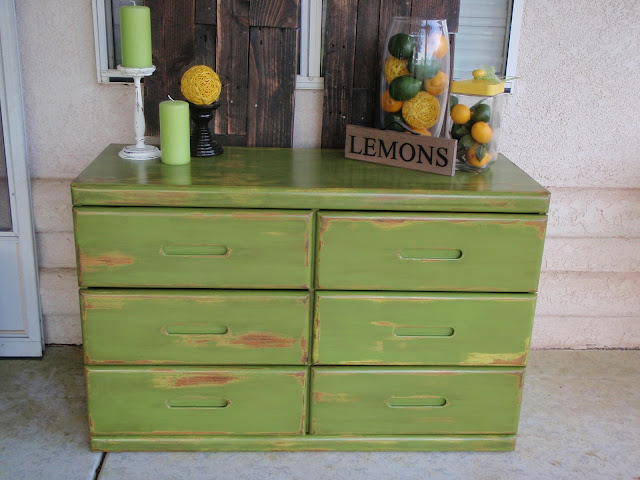
And here is my finished dresser. I have to admit, after staining it, it did come out a bit bolder than planned, but hey, Go Green! Right?? It fits right in with my lemon and lime kitchen decor and I am so excited to get moved so I can start using this bad boy cause this is no longer just an ordinary dresser folks! 

Ta-dah!!! I kinda like it!


Saturday, October 13, 2012

PVC Candles

I made these PVC candles to dress up a shelf in my kitchen and I love how they turned out!

I started off by heading out to my husbands family business  to swipe some PVC pipe scraps, I was caught by my husband and had no choice but to beg him to cut them to the lengths I wanted, and he did! What a sweet heart!

When I got them home I filled them with the spray insulation  that you use to fill in cracks. Be careful because it can swell and come out the top, if this happens just saw it off with a knife-carefully.


If you want you can cut out a spot to set in a tea light.

The fun part is dribbling hot glue down the sides of the PVC. Use a cookie sheet turned over so you can let it puddle on the bottom, it looks more realistic. I let it cool and then did another layer. Be sure and mix it up a little, don't do every candle the same.

I know what you are thinking, I have gotten a little carried away! You can never have to much of a good thing-right? See how good the puddles look?

When I got done with the hot glue, I just painted them with good old tole paint. You can paint them any color you choose, I did white because I can use them with any holiday.

I put them on a high shelf in my kitchen so I didn't put tea light in them. I also found this silver platter at a thrift store for $2.00 and painted it with a chalk board paint. The ghost was painted by my dad probably 30 years ago.

I think it turned out wonderful! It is something that everyone comments on when they come into my kitchen, and I love to tell them how they were made.

Wednesday, October 3, 2012

Loving my Lollies!


This is a "WICKED" lollie banner I made after I fell in love with lollies.

I love how these look on a shelf in my library, and they were so much fun to make!

I also made the wicked witch picture out of an old cupboard front. The how too's for her are coming up.


I used a cupboard front and sprayed it black then sanded it to death. 

Then I found this awesome picture and ran it off on card stock and cut it to fit . Then I modge podged it top the front of the cupboard.

Now the fun part! I used old string, made some lollies out of fun chipboard letters, added feathers, moss and string and I just love how it turned out!